System Settings
Within ControliQ the employee positions feature allows you to set different roles or grades and their respective cost per hour to be used when setting up Staff Members. The different positions will then be used to more accurately calculated the Cost per Standard Hour values displayed in the Control and Production reports as the employees and their position/grade will be considered along with the cost of any overtime used.
To create a new Employee Position, select the Employee Position link from the Add/View section of the System Settings screen.
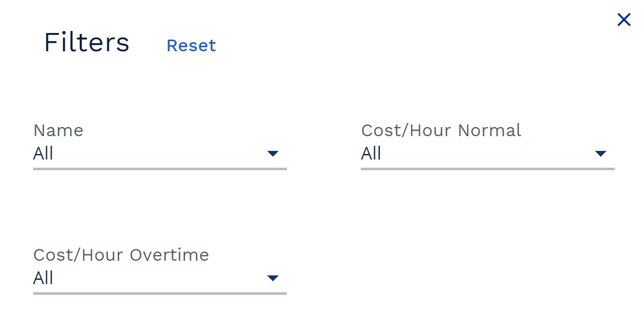
The Employee Position screen will display all existing Employee Positions.

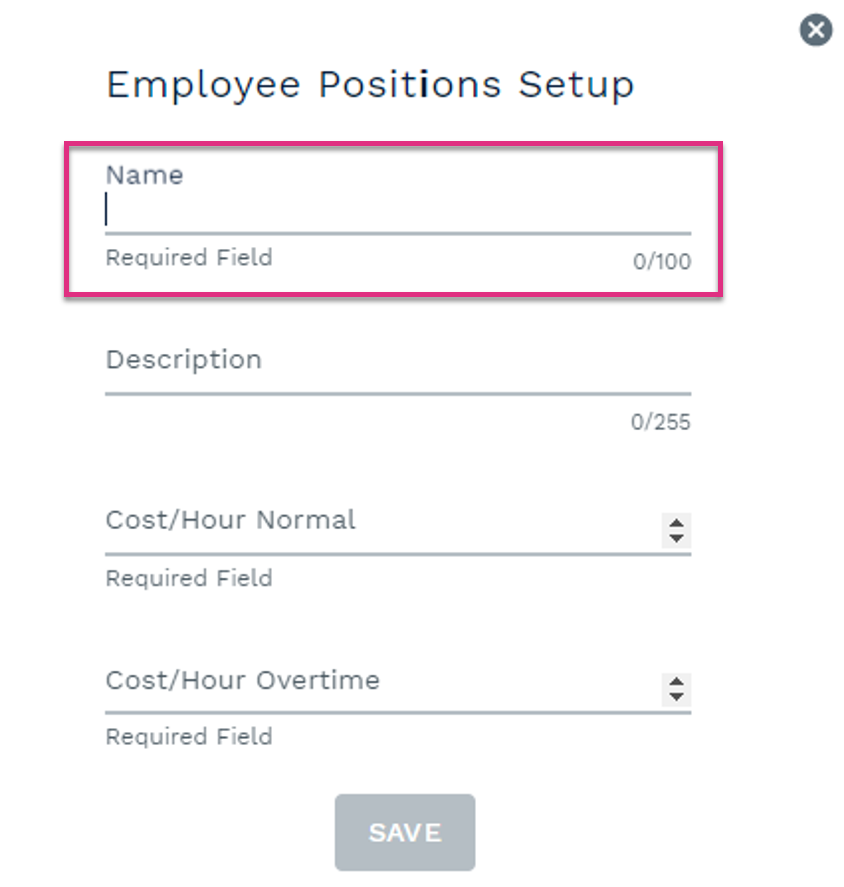
Name
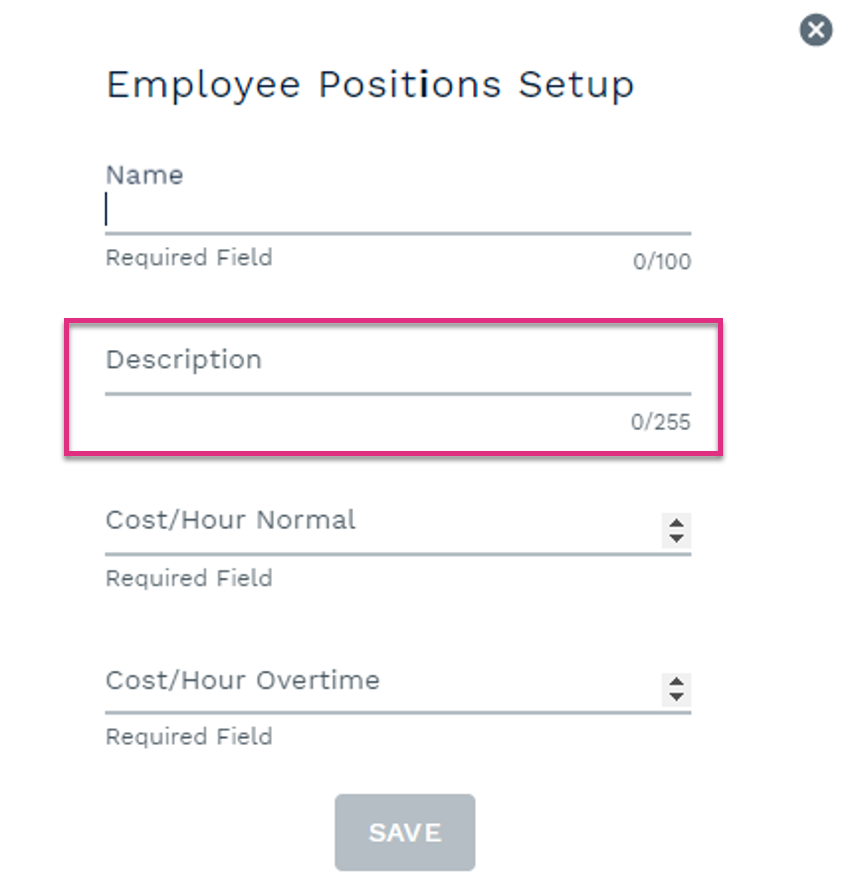
Description
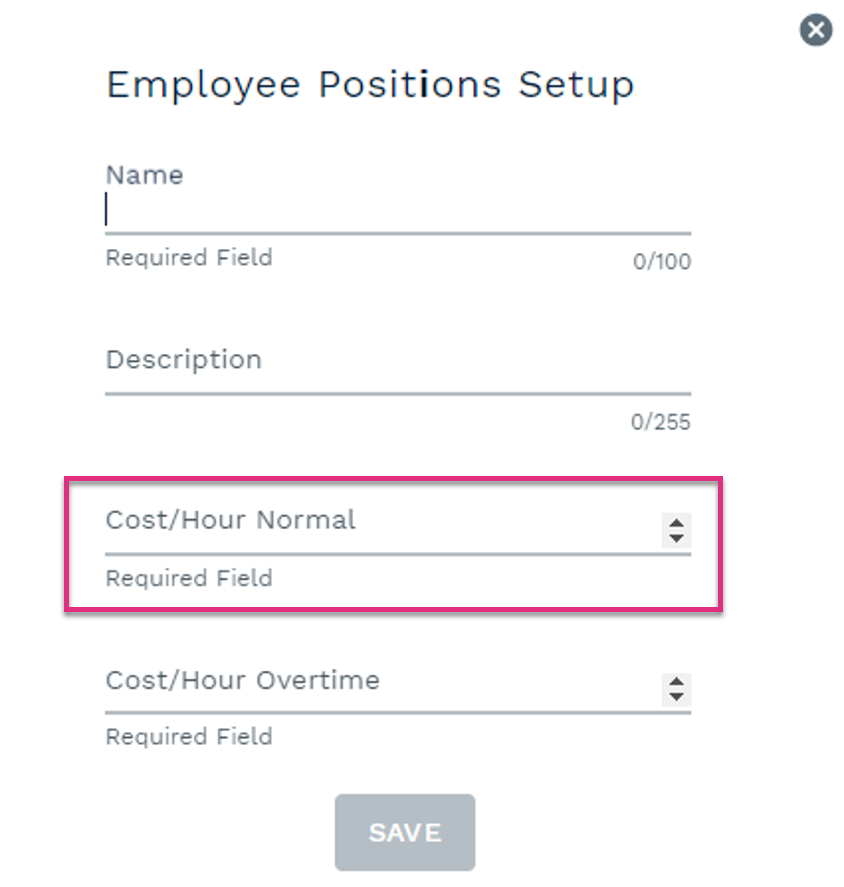
Cost / Hour Normal
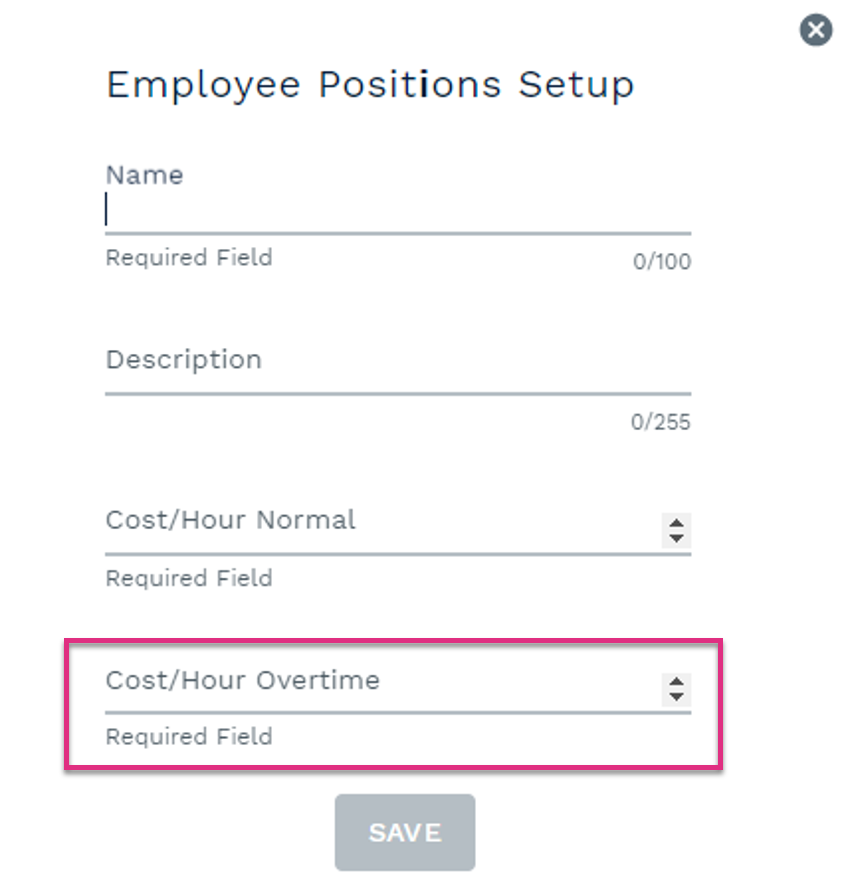
Cost / Hour Overtime
|
|||||||||||||||||||||
|
|
|
|||||||
|
|
|
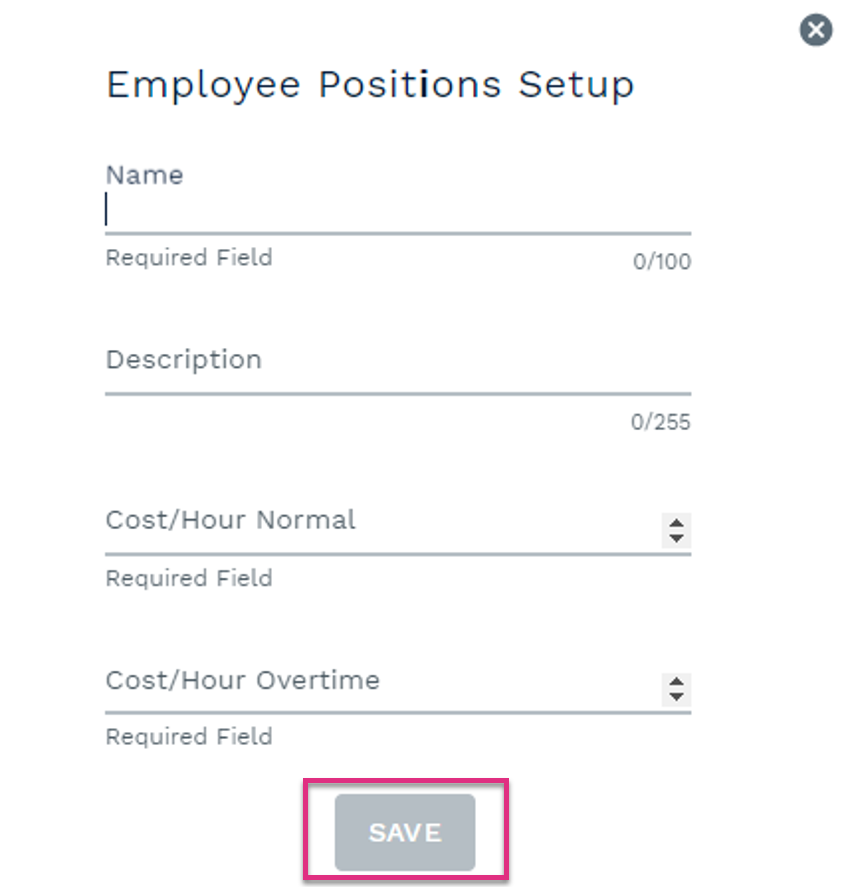
To create a new Employee Position, click the  icon next to the Employee Position header. This will prompt the Employee Position Setup dialogue box to open.
|
The Default Skill Levels feature allows you to set the Productivity level that you can expect staff members to achieve when completing tasks and further define Skill Levels for ease of reference by colour coding skills.
Please note this feature does not feed the Smart Skills Centre, it is used to set the defaults for skills assigned in the Skill Levels to Staff Member feature found in the Admin screen.
To define the default settings for skill levels, select the Default Skill Levels link in the Add/Edit section of the System Settings screen.


|
Once you have set the number of skill levels you would like to use update the table to reflect the productivity score you would expect someone of that skill to achieve and the Red, Amber, Green status indicating:
Red – Under skilled / No Skill
Amber – Developing / Some skill
Green – Skilled
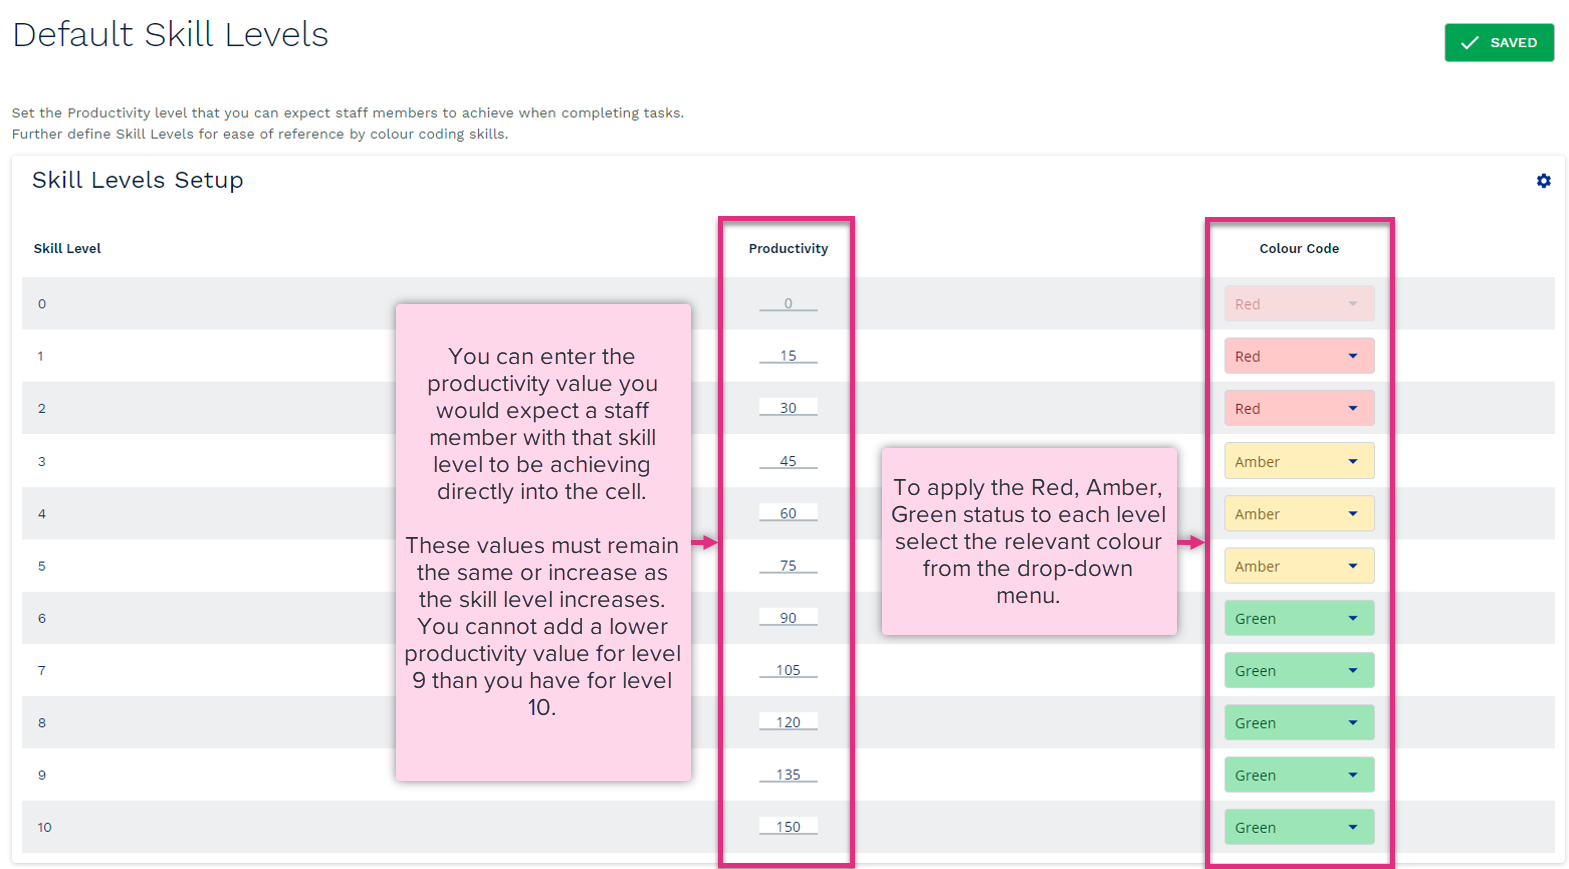
Once set these skill levels can be assigned to staff members for all the core tasks, they work on in the Skills to Staff Members section of the Admin screen.

Within ControliQ Roles determine what features and functionality a user can access when they login to the system.
To create new or edit exiting Roles select the Roles link in the Add / View section of the System Settings screen.
This will display a list of all existing Roles.

Name
Description
|
|
|
To create a new Role click the  icon next to the Roles header. This will prompt the Roles Setup dialogue box to open.
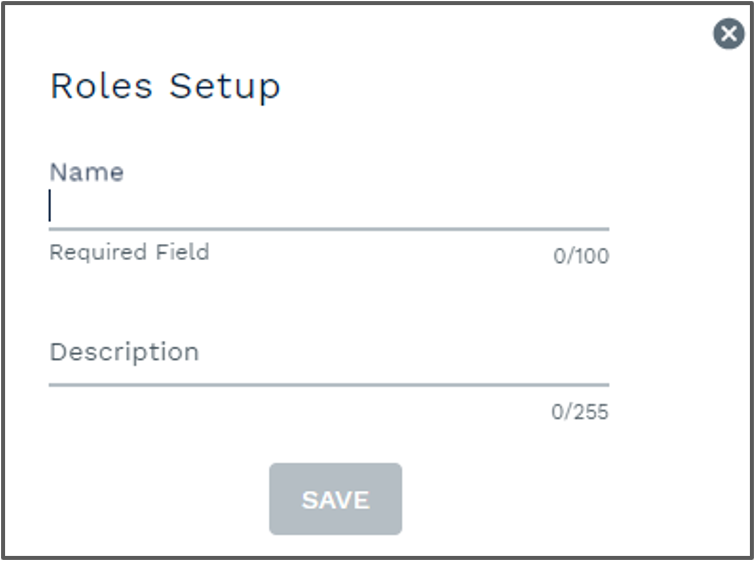
Enter the name of the Role you are creating, remembering to apply any standard naming conventions defined by your organisation. You can add any additional information up to 255 characters in the Description field. Once you click Save the Role will appear in the list of existing Roles.
Once you have created the Role you need to define the ControliQ features that this Role will provide access to. To do this select the Permissions to Role link in the Assign section of the System Settings screen.
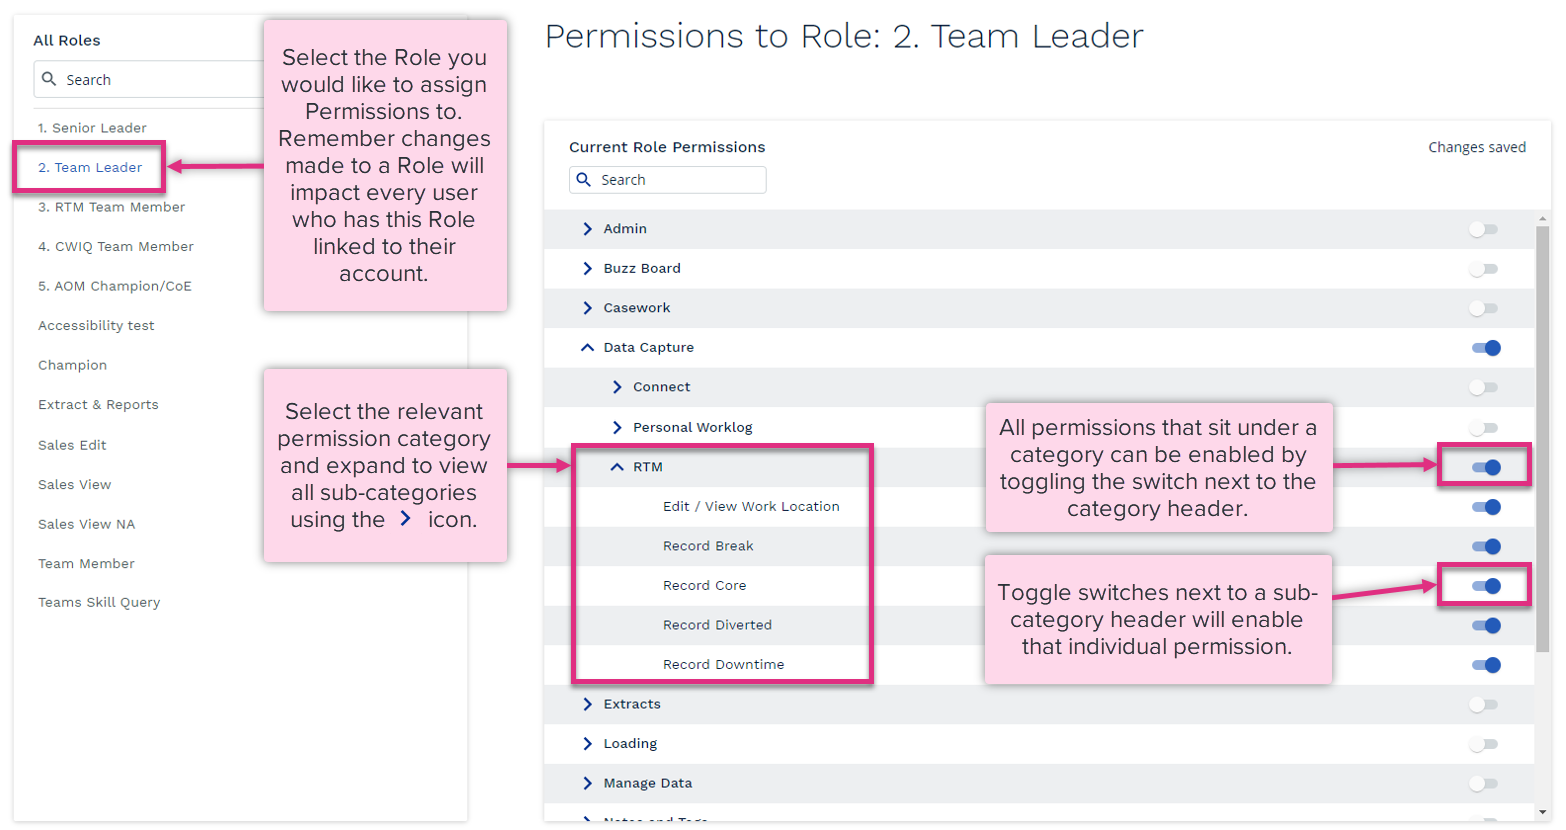
| Admin Permission | Admin Sub-Permission | Description |
|---|---|---|
|
Audit |
Provides access to the Audit Log in the Admin screen. |
|
|
Connect |
Add / Edit / Delete |
Provides access to the Data Integration section of Admin allowing Source Systems and Mappings to be created, edited and deleted. |
|
Core Tasks |
Add / Edit / Delete |
Provides access to the Add/View section of Admin allowing Core Tasks to be created, edited and deleted. |
|
Core Tasks |
Assign to Team / Department |
Provides access to the Assign section of Admin allowing Core Tasks to be assigned to workgroups. |
|
Core Tasks |
Edit Core Task Visibility in RTM |
Provides access to the Hide Tasks in RTM feature in the Assign Core Tasks to Workgroups screen. |
|
Core Tasks |
Edit / View Service Indicators Input (Series 3.0) |
Provides access to the Service Indicators section of the Core Task Setup form allowing Service Indicator SLA’s and Completion Targets to be added and amended. |
|
Core Tasks |
View |
Provides access to the Add/View section of Admin allowing Core Tasks to be viewed but not created or edited. |
|
Departments |
Add / Edit / Delete |
Provides access to the Add/View section of Admin allowing Departments to be created, edited and deleted. |
|
Departments |
Assign to Team / Department |
Provides access to the Assign section of Admin allowing Departments to be assigned to workgroups. |
|
Diverted Tasks |
Add / Edit / Delete |
Provides access to the Add/View section of Admin allowing Diverted Tasks to be created, edited and deleted. |
|
Diverted Tasks |
Assign to Team / Department |
Provides access to the Assign section of Admin allowing Diverted Tasks to be assigned to workgroups. |
|
Downtime |
Add / Edit / Delete |
Provides access to the Add/View section of Admin allowing Downtime Categories to be created, edited and deleted. |
|
Downtime |
Assign to Team / Department |
Provides access to the Assign section of Admin allowing Downtime Categories to be assigned to workgroups. |
|
Groups |
Add / Edit / Delete |
Provides access to the Add/View section of Admin allowing Groups to be created, edited and deleted. |
|
Groups |
Assign to Group |
Provides access to the Assign section of Admin allowing workgroups to be assigned to Groups. |
|
National Holidays |
Add / Edit / Delete |
Provides access to the Add/View section of Admin allowing National Holidays to be created, edited and deleted. |
|
National Holidays |
Assign to Team / Department |
Provides access to the Assign section of Admin allowing National Holidays to be assigned to workgroups. |
|
Staff Members |
Add / Edit / Delete |
Provides access to the Add/View section of Admin allowing Staff Members to be created, edited and deleted. |
|
Staff Members |
Assign Login Permissions |
Provides access to the Assign section of Admin allowing User Permissions to be assigned to Staff Members and Users with the login option selected |
|
Staff Members |
Assign to Team |
Provides access to the Assign section of Admin allowing Staff Members to be assigned to teams. |
|
Staff Members |
Skill Levels to Staff Member |
Provides access to the Assign section of Admin allowing Skill Levels to be added and amended for staff members |
| Core Task Standard Time Optimiser | Add / Edit |
Provides access to the Optimiser and Admin Reports section of Admin and allows the Standard Time Optimiser to be generated, viewed and standard times optimised. |
| Core Task Standard Time Optimiser | Add / View |
Provides access to the Optimiser and Admin Reports section of Admin and allows the Standard Time Optimiser to be generated, viewed. |
| Core Task Standard Time Optimiser | View |
Provides access to the Optimiser and Admin Reports section of Admin and allows the Standard Time Optimiser to be viewed. |
|
Tags |
Add / Edit / Delete / Assign |
Provides access to the Add/View section of Admin allowing Tags to be created, edited and deleted as well as enabling the Link / Unlink Tags icon in the Core, Diverted and Downtime setup screen. |
|
Task Groups |
Add / Edit / Delete |
Provides access to the Add/View section of Admin allowing Task Groups and Outcomes to be created, edited and deleted. |
|
Task Groups |
Assign to Task Group |
Provides access to the Assign section of Admin allowing tasks to be linked to Task Groups or Outcomes |
|
Teams |
Add / Edit / Delete |
Provides access the Add/View section of Admin allowing Teams to be created, edited and deleted. |
|
Teams |
Casework Settings |
Allows users to specify TAF tolerance for CaseworkiQ teams. |
|
Teams |
Set Location to Required Field in Data Capture |
Allows user to specify that working location is a mandatory field for data capture using RTM or the Casework Worklog. |
|
Usage Report |
|
Provides access to the Optimiser and Admin Reports section of Admin allowing the Usage Report to be downloaded |
| Business Planning Permission | Business Planning Sub-Permission | Description |
|---|---|---|
|
Business Planning |
Business Planning (Series 4.0) |
Provides access to all Business Planning functionality. |
| Buzz Board Permission | Buzz Board Sub-Permission | Description |
|---|---|---|
|
Buzz Board |
Buzz Board (Series 3.0) |
Provides access to the Buzz Board menu tab in the main ControliQ menu allowing a Buzz Board to be created and edited when a team is selected from the hierarchy selector. |
| Casework Permission | Casework Sub-Permission | Description |
|---|---|---|
|
Admin |
Add / Edit / Delete |
Provides access to the Add/View section of Admin allowing creation, editing and deleting of case categories, types, SLA types and stages. Also provides access to the Assign section of Admin where these elements can be linked and unlinked from workgroups. |
|
Admin |
Source Systems |
Provides access to the Integration section of Admin allowing the creation, editing and deletion of CaseworkiQ Source Systems for the bulk upload of cases. |
|
Case Effort |
Add / Edit / Delete for Staff Member |
Provides access to the Case Worklog for the staff member linked to the account being used to add, edit of delete production data. |
|
Case Effort |
Add / Edit / Delete for team Leader |
Provides access to the Case Worklog for at a team level, individual staff members will appear in a drop-down menu to add, edit of delete production data. |
|
Case Management |
Add / Edit / Assign |
Provides access to the Cases screen and Case Worklog function allowing creation, basic editing and assigning of cases. |
|
Case Management |
Change Case Category And Type |
Provides access to the edit function for case type and category through the case details / history screen. |
|
Case Management |
Delete / Change SLA / Change Closed Date |
Provides access to the edit function for SLA dates and Closed dates through the case details / history screen. Also enables the ability to delete cases and edit case id's. |
|
Case Management |
Export |
Provides access to the Cases screen to export Open, Closed and Pending cases to MS Excel. |
|
Case Management |
Record Case Tags |
Allows users to attach, edit or delete Case Tags for individual cases in CaseworkiQ, this relates to the capture of Case Tags data not the creation and linking of new Case Tags |
|
Case Management |
Reopen |
Provides access to the Cases screen and Case Worklog function allowing cases with a status of Closed to be re-opened. |
|
Case Management |
Upload |
Provides access to the Upload Cases option in the ControliQ Data Capture menu and the Integration section of the Admin screen allowing the upload of cases via case Source Systems. |
|
Reports |
Average Duration Time |
Provides access to the Average Duration Time report under the Reports ControliQ menu. |
|
Reports |
Average Handling Time |
Provides access to the Average Handling Time report under the Reports ControliQ menu. |
|
Reports |
Dashboard |
Provides access to the Casework Dashboard under the Dashboard ControliQ menu. |
|
Reports |
Task Handling Time |
Provides access to the Task Handling Time report under the Reports ControliQ menu. |
| Data Capture Permission | Data Capture Sub-Permission | Description |
|---|---|---|
|
Connect |
Upload / Publish / Rollback |
Provides access to the Upload option under the ControliQ Data Capture menu and the Integration section of Admin allowing the upload, publish and rollback of data captured via ControliQ Connect Source Systems. |
|
Personal Worklog |
Edit All Data > Edit / View Core |
Provides access to the My Worklog option under the ControliQ Data Capture menu allowing for the adding, editing and deleting of Core work related data for the staff member the account is linked to for any date. |
|
Personal Worklog |
Edit All Data > Edit / View Diverted |
Provides access to the My Worklog option under the ControliQ Data Capture menu allowing for the adding, editing and deleting of Diverted related data for the staff member the account is linked to for any date. |
|
Personal Worklog |
Edit All Data > Edit / View Time Worked |
Provides access to the My Worklog option under the ControliQ Data Capture menu allowing for the adding, editing and deleting of Time Worked related data for the staff member the account is linked to for any date. |
|
Personal Worklog |
Edit Current Day Data > Edit / View Core |
Provides access to the My Worklog option under the ControliQ Data Capture menu allowing for the adding, editing and deleting of Core work related data for the staff member the account is linked to for the current day only. |
|
Personal Worklog |
Edit Current Day Data > Edit / View Diverted |
Provides access to the My Worklog option under the ControliQ Data Capture menu allowing for the adding, editing and deleting of Diverted related data for the staff member the account is linked to for the current day only. |
|
Personal Worklog |
Edit Current Day Data > Edit / View Time Worked |
Provides access to the My Worklog option under the ControliQ Data Capture menu allowing for the adding, editing and deleting of Time Worked related data for the staff member the account is linked to for the current day only. |
|
Personal Worklog |
Edit / View Work Location |
Enables the Location function in My Worklog allowing the addition of a work location for the date being viewed for the staff member the account is linked to. |
|
Personal Worklog |
RTM History for Team Member > Edit / View |
Enables the RTM History tab in My Worklog for the staff member the account is linked to allowing for the viewing and editing of core task volumes and activity start and end times for the data captured in RTM on the selected date. Also provides an overview of the key metrics Time Worked, Core Time, Diverted Time, Downtime and Break. |
|
Personal Worklog |
RTM History for Team Member > View |
Enables the RTM History tab in My Worklog for the staff member the account is linked to allowing for the viewing of core task volumes and activity start and end times for the data captured in RTM on the selected date. Also provides an overview of the key metrics Time Worked, Core Time, Diverted Time, Downtime and Break. |
|
RTM |
Edit / View Work Location |
Enables the Work Location function in RTM Data Capture. The Work Location option will appear in the RTM Start Session pop-up. |
|
RTM |
Record Break |
Enables the capture of time related to Breaks via RTM Data Capture. |
|
RTM |
Record Core |
Enables the capture of time related to Core work via RTM Data Capture. |
|
RTM |
Record Diverted |
Enables the capture of time related to Diverted work via RTM Data Capture. |
|
RTM |
Record Downtime |
Enables the capture of time related to Downtime via RTM Data Capture. |
| Executive Insights Permission | Executive Insights Sub-Permission | Description |
|---|---|---|
|
Executive Insights |
Executive Insights (Series 4.0) |
Provides access to all Executive Insights functionality. |
| Extracts Permission | Extracts Sub-Permission | Description |
|---|---|---|
|
Pre-Aggregated Data |
|
Provides access to Extracts that contain pre-aggregated data providing a view of key metrics such as Work In, Work Out, WIP as a workgroup total. |
|
Raw Data |
|
Provides access to Extracts that contain raw data providing a view of all data points entered as part of capturing production data. |
| Loading Permission | Loading Sub-Permission | Description |
|---|---|---|
|
Loading |
Add / Edit / Delete |
Provides access to the ControliQ Loading menu when a workgroup higher than team is selected allowing for the creation, editing, deletion and use of Loading Boards. |
|
Loading |
Summary Board Add / Edit / Delete |
Allows users to add / edit and delete the Summary Loading Board, used to display key plan metrics for workgroups containing ControliQ and CaseworkiQ plans. |
| Manage Data Permission | Manage Data Sub-Permission | Description |
|---|---|---|
|
Staff Members |
Edit / View Work Location |
Enables the Work Location feature in the Manage Data screen allowing for the capture or amendment of Work Locations for staff members. |
|
Staff Members |
RTM History for Team Leader > Edit / View |
Enables the RTM History tab in the Manage Data screen allowing for the viewing and editing of core task volumes and activity start and end times for the data captured in RTM on the selected date. |
|
Staff Members |
RTM History for Team Leader > View |
Enables the RTM History tab in the Manage Data screen allowing for the viewing of core task volumes and activity start and end times for the data captured in RTM on the selected date. |
|
Staff Members |
Summary (Time Worked / Diverted / Core / Verification) |
Provides access to the ControliQ Manage Data menu allowing for the adding, editing, deleting and verification of production data for staff members. Please note for CaseworkiQ users this role allows for the viewing and verification of production data, adding, editing and deleting is completed via the Case Worklog. |
|
Workgroup |
|
Provides access to the ControliQ Manage Data menu allowing for the adding, editing, deletion and adjustment of Work In and Work in Progress data. |
| Notes and Tags Permission | Notes and Tags Sub-Permission | Description |
|---|---|---|
|
Record Notes |
All Other Modules |
Provides access to the Notes and Comments feature throughout ControliQ. |
|
Record Notes |
RTM |
Provides access to the Notes feature via RTM Data Capture |
|
Record Tags |
|
Enables the Tags icon in RTM Data Capture and Manage Data allowing for the capture of Tags against tasks. |
| Notifications Permission | Notifications Sub-Permission | Description |
|---|---|---|
|
Notifications |
Provides access to the Notifications feature allowing for the configuration of the selected notification types via the bell icon |
| Opi Permission | Opi Sub-Permission | Description |
|---|---|---|
|
Opi |
Opi Control (Series 4.0) |
Activates Opi in the Control report for the user. |
| Opi | Opi Live Status (Series 4.0) |
Activates Opi in the Live Status Dashboard for the user. |
| Planning Permission | Planning Sub-Permission | Description |
|---|---|---|
|
Planning |
Provides access to the ControliQ Planning menu allowing for the configuration, creation, editing and deletion of plans. |
| Reports Permission | Reports Sub-Permission | Description |
|---|---|---|
|
Reports |
|
Provides access to ControliQ Reports and ControliQ Dashboard menus allowing for the review of production data. Please note: CaseworkiQ specific reports are enabled via the Casework permissions section. Permission for the Individual Performance Dashboard can be granted for whole teams (Team Leader option) or just for the staff member linked to the account being used (Staff Member option). Permission for the Live Status Dashboard Team Insight section can be granted for whole teams (Team Leader option) or just for the staff member linked to the account being used (Staff Member option) |
|
View Task Groups |
|
Enables the View Task Groups feature in reports allowing the option to show or hide Task Groups when running reports. |
| Smart Skills Centre Permission | Smart Skills Centre Sub-Permission | Description |
|---|---|---|
|
Smart Skills Centre (Series 4.0) |
Provides access to the ControliQ Smart Skills Centre menu allowing for the configuration of Smart Skills, the setting of skill targets and the update of staff member skill levels. |
| System Settings Permission | System Settings Sub-Permission | Description |
|---|---|---|
|
Access Tokens |
|
Provides access to the Access Tokens feature in System Settings allowing for Access Tokens to be created and deleted. |
|
Default Skill Levels |
|
Provides access to the Default Skill Levels feature in System Settings allowing the configuration of the number of skill levels utilised and the application of a productivity value and RAG status to each level. |
|
Employee Positions |
Add / Edit / Delete |
Provides access to the Employee Positions feature in System Settings allowing for the creation, editing and deletion of Employee Positions. |
|
Languages |
|
Allows for the selection of English or French Canadian through the Account Settings feature |
|
Roles |
Add / Edit / Delete |
Provides access to the Roles feature in System Settings allowing for the creation, editing and deletion of Roles. |
|
Roles |
Assign Permissions to Role |
Provides access to the Assign Permissions to Role feature in System Settings allowing for the enabling and disabling of permissions for new and existing Roles |
|
Workgroups to Licenced Module |
Assign Workgroup to Module |
Provides access to the Assign Workgroup to Module feature in System Settings allowing for the activation and de-activation of additional modules already toggled on in the backend of ControliQ such as Casework and Smart Planning for workgroups. |
The Access Token feature within ControliQ allows a user to make use of the Integration API to integrate ControliQ and client systems. Before this API can be utilised the user must have an Access Token.
To get a token select the Access Tokens link in System settings.

Username
Name
Expires On
Permissions
Workgroup
Revoked
Expired
|
|
Selecting this icon will allow you to revoke an Access Token so that it can no longer be used. Please note this does not delete the Access Token from the Access Tokens screen it just revokes it so it can no longer be used. |
|
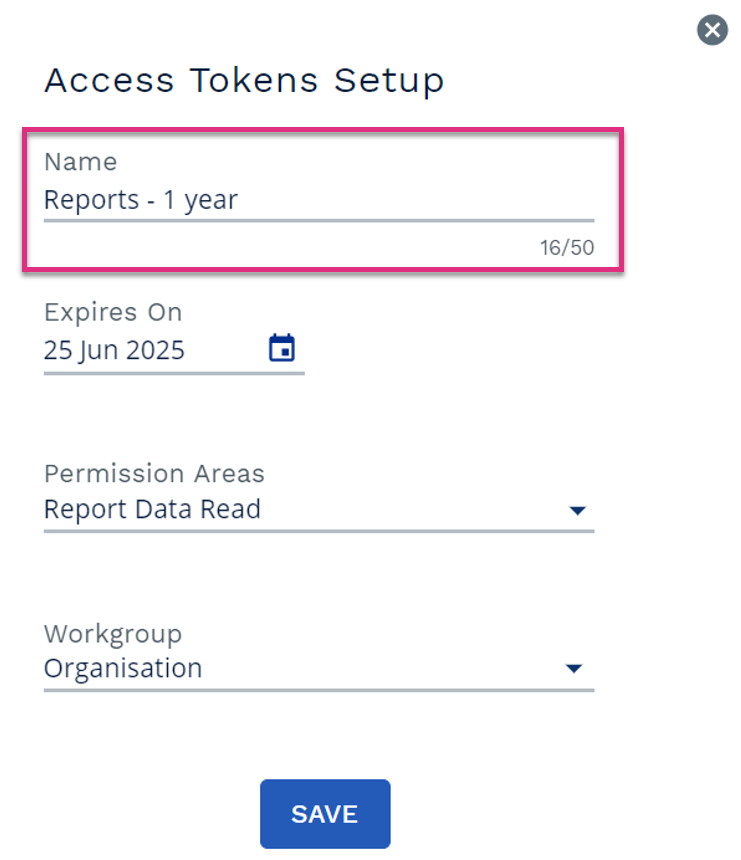
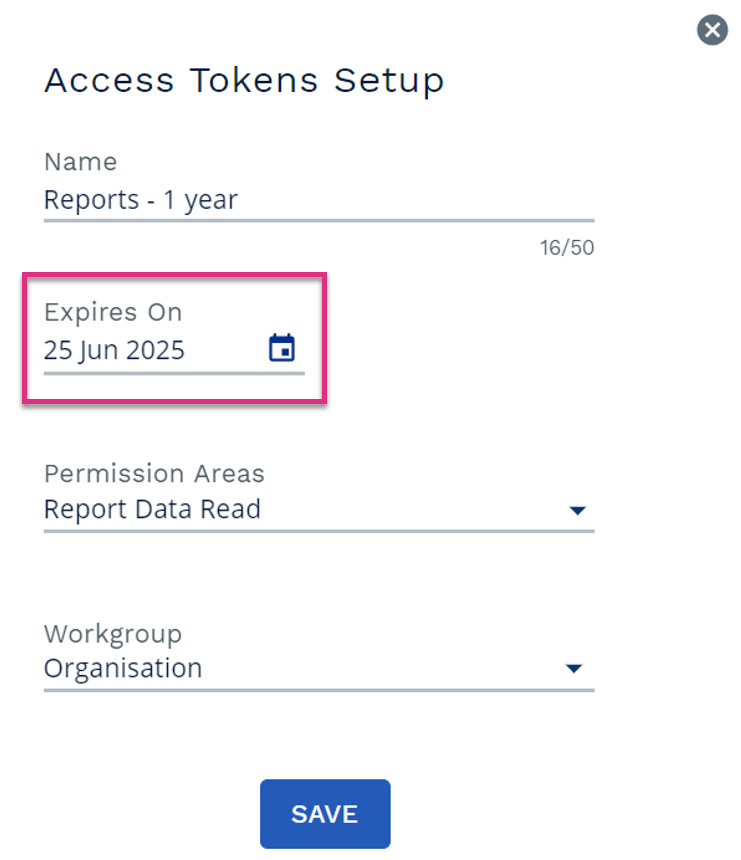
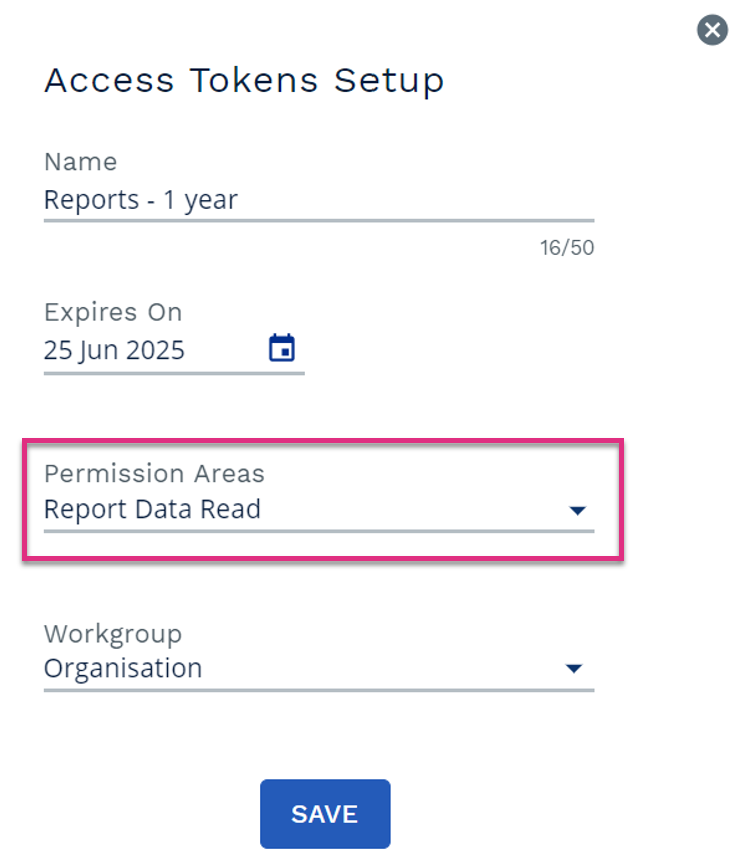
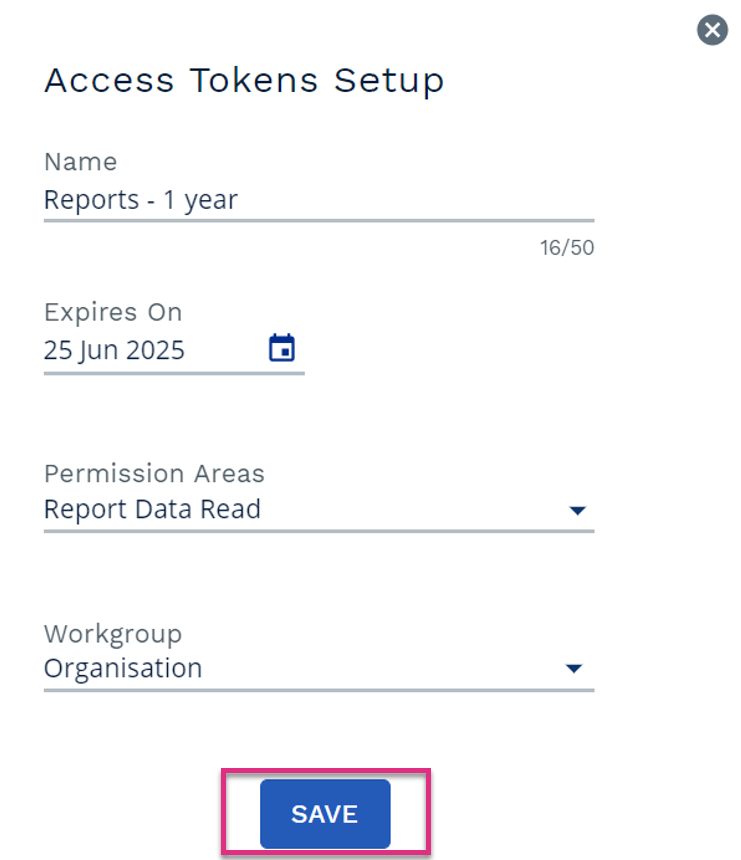
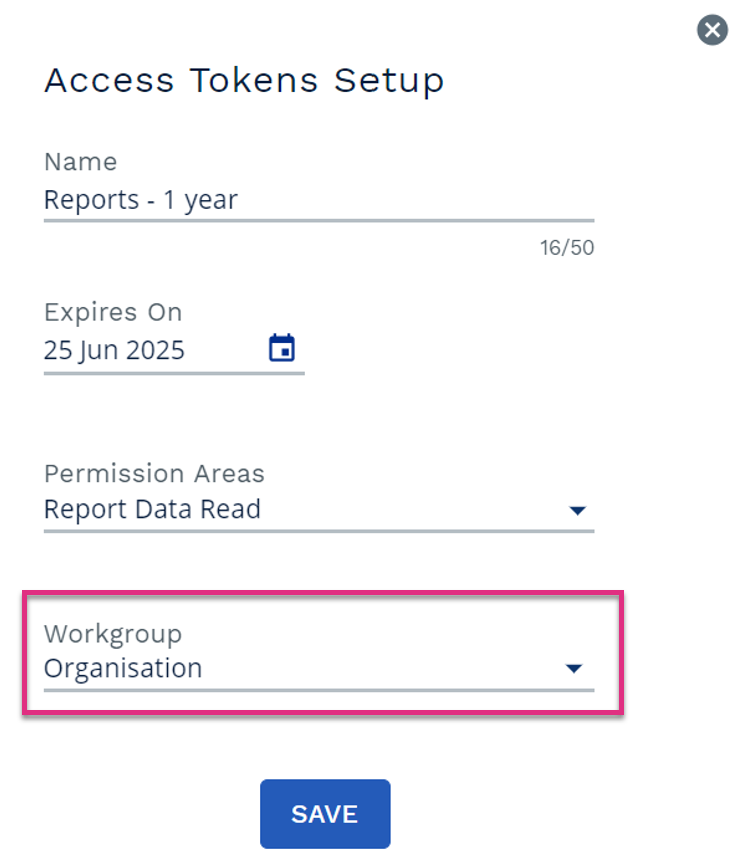
To create a new Access Token, select the  icon next to the Access Token header. This will prompt the Access Token setup form to open.
|
Once the Bearer Token has been added to the system that is integrating with ControliQ the user will be able to utilise the existing APIs based on the Permission Areas granted.
| Permission Area | Details |
|---|---|
|
All |
Provides permissions to utilise all of the available API’s. |
|
Admin Create |
This API is still under development. |
|
Admin Read |
Provides permission to utilise API’s that extract Staff Member and User setup details from ControliQ Admin which provides a view of all the key setup information for Staff Members (those who can capture or have production data captured against them) and Users (those who can access ControliQ, but no production data is captured for). |
|
Admin Update |
This API is still under development. |
|
Case Data Create |
This API is still under development. |
|
Case Data Read |
This API is still under development. |
|
Case Data Update |
This API is still under development. |
|
Data Capture Create |
This API is still under development. |
|
Data Capture Read |
This API is still under development. |
|
Data Capture Update |
This API is still under development. |
|
Plan Data Create |
This API is still under development. |
|
Plan Data Read |
Provides permission to utilise API’s that extract Plan data which provides a view of the time allocated to each element of a committed plan such as time allocated to Work In, Work Out and WIP for each Core task based on Items multiplied by Standard Time or the time allocated to each Diverted task. |
|
Plan Data Update |
This API is still under development. |
|
Report Data Read |
Provides permission to utilise API’s that extract Production data which provides a view of all of the production data that has been entered into ControliQ. Please note this data does not include calculated values only those captured via RTM, Manage Data or Connect. The data required to calculate key metrics such as Core Time and Productivity is included in the extracted data. |
Please see the Integration API section for more information.
All published integration APIs can be found here: https://integration-api.workwareplus.com/index.html
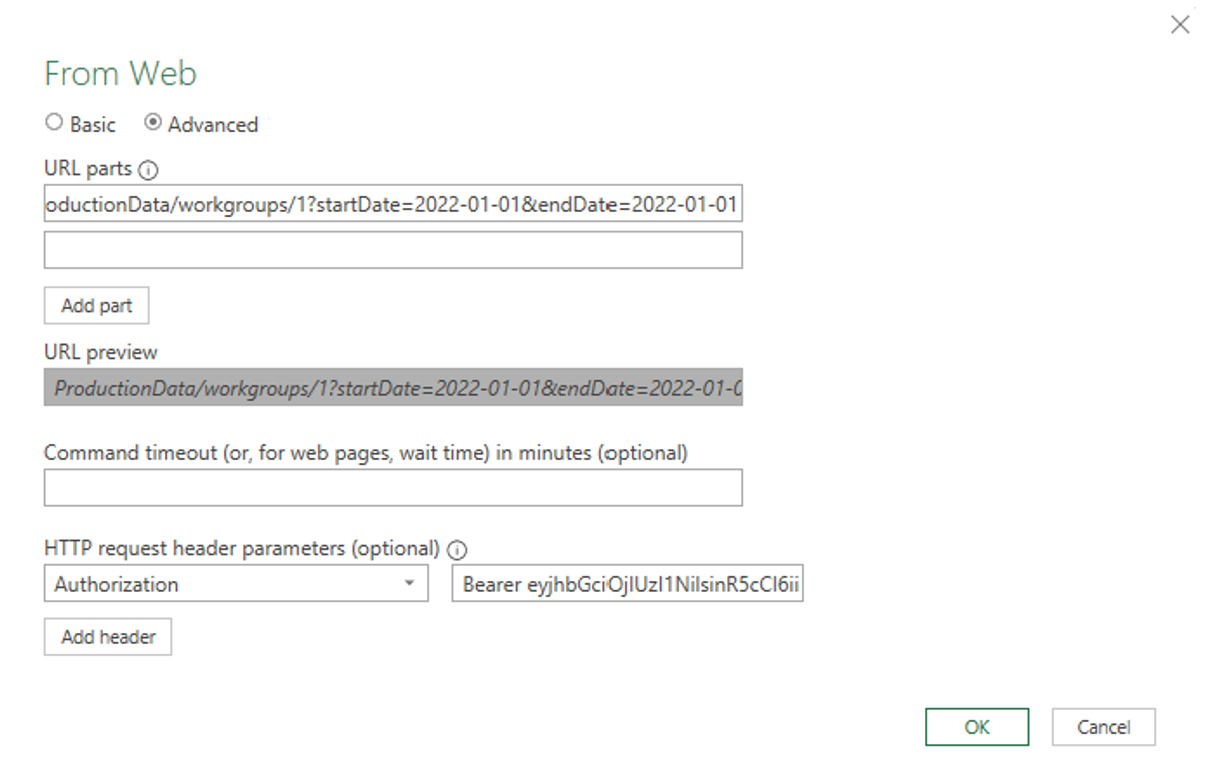
Clients may also choose to import data into Excel or MI tools such as PowerBi using Get Data>From Other Sources>From Web>Advanced in Excel for example. An example is shown below where the full URL and Token have been entered into the Excel dialogue screen.
With excel, you will need to choose Authorization for the header parameter and use the prefix Bearer ahead of the token.
Within ControliQ there are some features that appear within the standard ControliQ menus but form either part of a higher series (Smart Planning – Series 3.0) or another product (CaseworkiQ). Because these features don’t have their own tab within the menu, they need to be enabled via Workgroup to Licensed Module to appear in the existing ControliQ menus.
|
Please Note! Licensed Modules should only be enabled after discussion with your ActiveOps Relationship Manager. |
To enable a Licensed Module, click the Workgroup to Licensed Module link in System Settings.

The Workgroups to Licenced Module screen will display the modules that are available to be enabled along with a search function to refine the list of modules displayed if required.
To enable a module click on its name in the All Licensed Modules list.

When you select a module the workgroup you have selected in the hierarchy selector and any child workgroups will be displayed along with a checkbox indicating if the module is enabled for each workgroup or not. If the box appears checked  the module is enabled.
You can refine the list of workgroups displayed using the search function. You can search by either full or partial workgroup name.
To enable a module, select the checkbox next to the relevant workgroup.

If you select the checkbox next to the name of a parent workgroup the module will be enabled for all the child workgroups to.
|
Please Note If the Casework module is enabled for an existing ControliQ workgroup (RTM or Connect fed data capture) the data capture method will be replaced with CaseworkiQ. The ability to edit data via the Manage Data screen will be limited as it will be replaced with the functionality intended for CaseworkiQ team. You will not be able to edit any data that was captured using RTM or Connect. Once enabled the Casework module cannot be disabled if the workgroup has any Open or Pending cases assigned to it. |



 .
.
